
汽车车道视频检测:python+OpenCV为主实现
1 说明:
=====
1.1 完整版:汽车车道动态视频检测讲解和注释版代码,小白秒懂。
1.2 Python/ target=_blank class=infotextkey>Python+OpenCV+moviepy+numpy为主的技术要点。
1.3 代码来源:
https://github.com/linghugoogle/CarND-Advanced-Lane-Lines
#虽然感觉也是fork别人的,别忘了给他点个赞star
1.4 感谢原作者,并对文件进行修改和代码进行删减,注释等操作,便于操作和理解。
1.5 应用:无人驾驶汽车技术,热门!

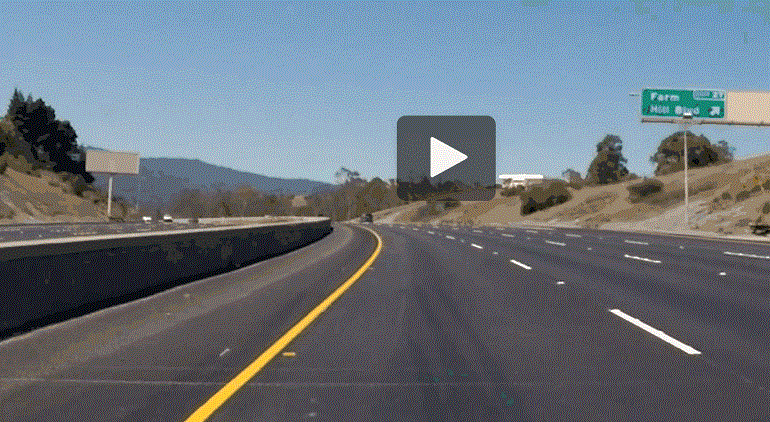
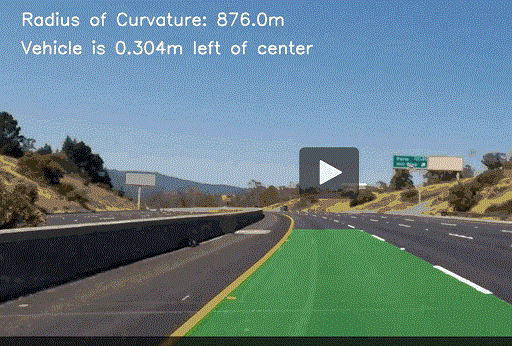
2 效果展示:由于gif≤10MB,所以是节选。
================================
2.1 原视频节选:
2.2 处理后视频节选:
3 准备:
=====
3.1 环境:python3.8+OpenCV4.2.0+deepin-linux操作系统。
3.2 文件结构:
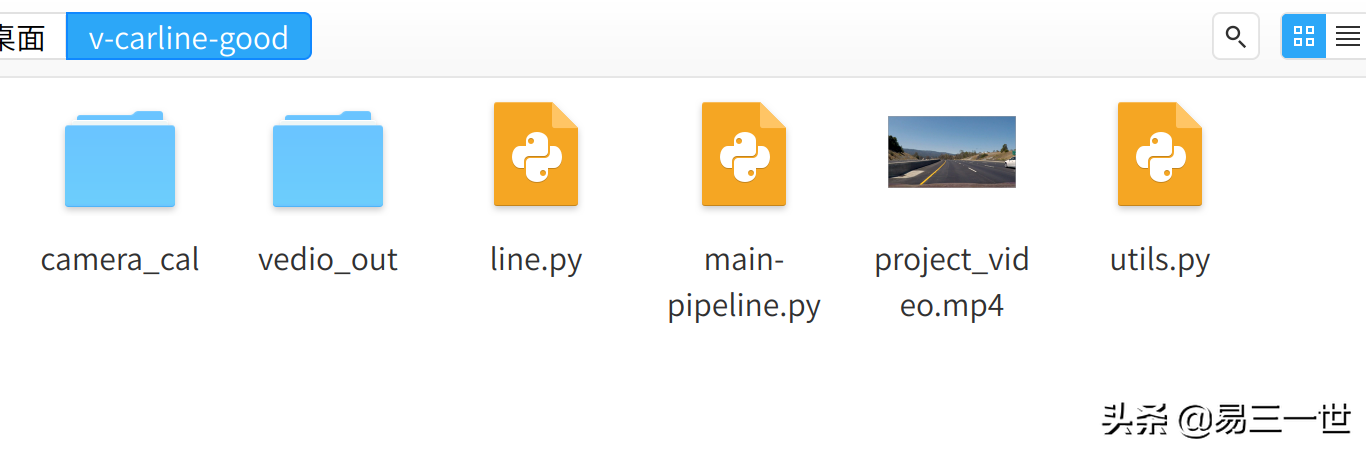
github下载下来
project_video.mp4 :原始视频,未进行标注
vedio_out:文件夹为输出被标注的视频(处理后的视频文件夹)
camera_cal:相机参数标定文件夹。
4 代码讲解:
=========
4.1 line.py代码:
# -*- coding: utf-8 -*-
#导入模块import numpy as np
#定义line这个类class Line():    #初始化参数    def __init__(self):
        # was the line detected in the last iteration?
        self.detected = False
        # x values of the last n fits of the line        self.recent_fitted = [np.array([False])]
        #average x values of the fitted line over the last n iterations        self.bestx = None
        #polynomial coefficients averaged over the last n iterations        self.best_fit = None
        #polynomial coefficients for the most recent fit
        self.current_fit = [np.array([False])]
        #radius of curvature of the line in some units
        self.radius_of_curvature = None
        #distance in meters of vehicle center from the line
        self.line_base_pos = None
        #difference in fit coefficients between last and new fits
        self.diffs = np.array([0,0,0], dtype='float')
        #x values for detected line pixels
        self.allx = None
        #y values for detected line pixels
        self.ally = None
        #检测侦测    def check_detected(self):
        if (self.diffs[0] < 0.01 and self.diffs[1] < 10.0 and self.diffs[2] < 1000.) and len(self.recent_fitted) > 0:
            return True
        else:
            return False
        #更新    def update(self,fit):
        if fit is not None:
            if self.best_fit is not None:
                self.diffs = abs(fit - self.best_fit)
                if self.check_detected():
                    self.detected =True
                    if len(self.recent_fitted)>10:
                        self.recent_fitted = self.recent_fitted[1:]
                        self.recent_fitted.Append(fit)
                    else:
                        self.recent_fitted.append(fit)
                    self.best_fit = np.average(self.recent_fitted, axis=0)
                    self.current_fit = fit
                else:
                    self.detected = False
            else:
                self.best_fit = fit
                self.current_fit = fit
                self.detected=True
                self.recent_fitted.append(fit)
4.2 utils.py代码省略。
4.3 main-pipeline.py(就是代码为:pipeline.py)
# -*- coding: utf-8 -*-
#第1步:导入模块
import os
import cv2import matplotlib.pyplot as plt
import numpy as np
from moviepy.editor import VideoFileClip
import line  #自定义模块import utils #自定义模块
#第2步:图片阈值处理
def thresholding(img):    #setting all sorts of thresholds    x_thresh = utils.abs_sobel_thresh(img, orient='x', thresh_min=10 ,thresh_max=230)
    mag_thresh = utils.mag_thresh(img, sobel_kernel=3, mag_thresh=(30, 150))
    dir_thresh = utils.dir_threshold(img, sobel_kernel=3, thresh=(0.7, 1.3))
    hls_thresh = utils.hls_select(img, thresh=(180, 255))
    lab_thresh = utils.lab_select(img, thresh=(155, 200))
    luv_thresh = utils.luv_select(img, thresh=(225, 255))
    #Thresholding combination    threshholded = np.zeros_like(x_thresh)    threshholded[((x_thresh == 1) & (mag_thresh == 1)) | ((dir_thresh == 1) & (hls_thresh == 1)) | (lab_thresh == 1) | (luv_thresh == 1)] = 1
    return threshholded
#第3步:视频拟合和图片纠正
def processing(img,object_points,img_points,M,Minv,left_line,right_line):    #camera calibration, image distortion correction    undist = utils.cal_undistort(img,object_points,img_points)    #get the thresholded binary image
    thresholded = thresholding(undist)    #perform perspective  transform    thresholded_wraped = cv2.warpPerspective(thresholded, M, img.shape[1::-1], flags=cv2.INTER_LINEAR)
    #perform detection    if left_line.detected and right_line.detected:
        left_fit, right_fit, left_lane_inds, right_lane_inds = utils.find_line_by_previous(thresholded_wraped,left_line.current_fit,right_line.current_fit)    else:
        left_fit, right_fit, left_lane_inds, right_lane_inds = utils.find_line(thresholded_wraped)    left_line.update(left_fit)    right_line.update(right_fit)    #draw the detected laneline and the information    area_img = utils.draw_area(undist,thresholded_wraped,Minv,left_fit, right_fit)    curvature,pos_from_center = utils.calculate_curv_and_pos(thresholded_wraped,left_fit, right_fit)    result = utils.draw_values(area_img,curvature,pos_from_center)    return result
#第4步:步骤:划线-校正-读取原视频和生成修改后的视频
#划线left_line = line.Line() #左线right_line = line.Line() #右线#获取棋盘格图片#使用提供的一组棋盘格图片计算相机校正矩阵(camera calibration matrix)和失真系数(distortion coefficients).cal_imgs = utils.get_images_by_dir('/home/xgj/Desktop/v-carline-good/camera_cal')
#计算object_points,img_pointsobject_points,img_points = utils.calibrate(cal_imgs,grid=(9,6))
M,Minv = utils.get_M_Minv()#需要修改的视频:原视频project_video_clip = VideoFileClip("/home/xgj/Desktop/v-carline-good/project_video.mp4")
#输出修改后的视频:完成视频project_outpath = '/home/xgj/Desktop/v-carline-good/vedio_out/project_video_out.mp4'
#制作视频project_video_out_clip = project_video_clip.fl_image(lambda clip: processing(clip,object_points,img_points,M,Minv,left_line,right_line))project_video_out_clip.write_videofile(project_outpath, audio=False)
5 完结:
=====
5.1 以上代码完整,但制作视频估计花20分钟,我也是将代码最简化跑起来。
5.2 如果逐步深入分析,可能要从基本开始。
5.3 可以参考这篇文章:
https://zhuanlan.zhihu.com/p/46146266